Setup FTP With FileZilla On Google Cloud

In this article, I will help you to setup FTP with FileZilla on google cloud to manage your files. You can connect, transfer and edit files on your VM Instance remotely. You can get simple and understandable steps to setup FileZilla on google cloud. Let’s have a brief look on PuTTY.
Before We Setup FTP With FileZilla On Google Cloud
Install PuTTYgen – We need to install PuTTYgen on our system. If you are working with Ubuntu you can check out our article How to Install PuTTY on Ubuntu Linux
Using PuTTY you can generate SSH Key. You can use this application to generate a private and public key pair in order to encrypt the connection between your Google Cloud instance and FileZilla.
Install FileZilla – We need to install FileZilla
Step 1:
open PuTTYgen from the search on your ubuntu same as below snap.

Step 2:
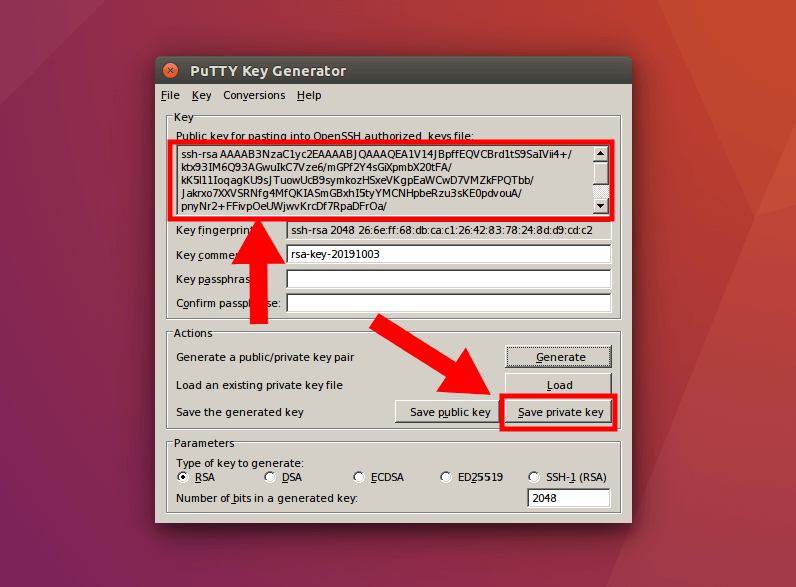
After you’ve downloaded PuTTY Key Generator, open the application and click the “Generate” button to create a new pair of SSH Keys. After clicking the “Generate” button, move your cursor under the progress bar to generate your SSH key files.

Step 3:
Copy and save the keys (Save Private Key) – After your SSH Key files have been generated, copy the public key text from the top box, and download the private key file by clicking the “Save private key” button.
- You can add the passphrase to protect it.
- add your own name of the key and save it in your preferred directory.

Step 4: Paste Public Key in Google Cloud
- Login to you Google Cloud Console
- From the hamburger menu in the upper left-hand corner of your Google Cloud Platform dashboard, navigate to Compute Engine > Metadata > SSH Keys. Click the “Edit” button.
- Scroll to the bottom of the “Edit” page, click the “Add item” button, and paste the Public Key text that you copied in Step 3 into the box. Finally, click “Save”.

Step 5: Upload Private Key in FileZilla
- Open FileZilla, and navigate to Edit > Preferences.
- Navigate to Connection > FTP > SFTP. Click the “Add key file…” button, and select the private key file that you downloaded in Step 3.

Step 6: Establish Connection to Google Cloud
- In order to establish a connection between Google Cloud and Filezilla, you will need both the IP Address to your instance and the username for your SSH Key.

Step 7: Configure FileZilla
- Open site manager from FileZilla (File=>Site Manager) and click on the “New Site” button.
- Add external IP Address in “Host” which is the copy from previous step.
- Select SFTP from the “Protocol” field.
- Add username in the “User” field which is the copy from the previous step.

That’s It. Now, You can remotely access your google cloud files and folder.
I hope it helped you in an easy way to configure FTP with FileZilla on google cloud with more understanding. Please let us know in the comment section if you have any concerns.
You can also share with your friends, who need to configure FTP with FileZilla on google cloud. Will meet you in my upcoming articles. Thank You!
Thanks for your time, to know about me.
Hello I Am Vijay Poshiya. 🙂
Here’s My little description of your attention on Me and My blog. I am here to help you with PHP programming. I can give you a cake walkthrough platform where a complex program can make it easier for you. I will also provide you with the rare collections of task sets over the internet.
I hope you will find your solutions in better understanding shape within my blog.
You can read more about PHPAdvices at the “About” page.


Leave a Comment